Roofing

Costs of Roof Replacement

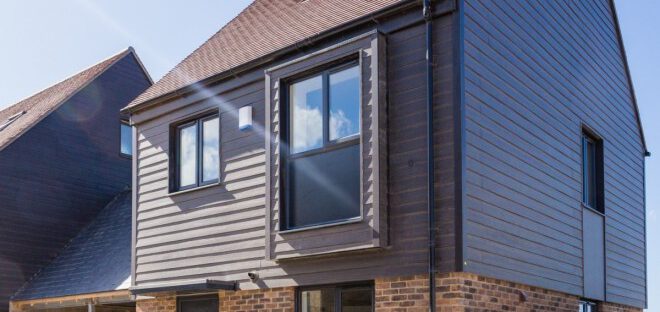
A new roof improves your home’s curb appeal and protects you from elements that damage the interior of your home. It can also help reduce your energy costs.

Roof Replacement

Roof Replacement NJ also offers a strong return on investment when it comes to resale value. Homebuyers are often willing to pay more for a house that has been recently upgraded with a modern, efficient roof.

The cost of a new roof is one of the most significant investment homeowners can make in their home. A sturdy, well-constructed roof protects the occupants and contents of the house and can add considerable value to the property in case the homeowner decides to sell it. It is therefore important to plan ahead and carefully consider all the elements that impact the costs of a new roof.

The majority of the costs associated with a roof replacement are related to labor and materials. The actual roofing material itself varies in price considerably from product to product, so it is essential that the homeowner understands what each option entails and selects an affordable yet high-quality roofing solution. The home size, location and unique features also influence the total costs, as some roof types are better suited to certain materials than others.

Other factors that affect the cost of a roof include the pitch (angle) of the roof and any features like chimneys or skylights that may need to be replaced. A steeper roof requires more materials, painstaking labor and often special equipment to install, which will drive up the overall cost of the project.

In some cases, a homeowner may be able to file an insurance claim for part or all of the cost of a new roof if it is necessary due to storm damage. It is a good idea to contact a local insurance agency to see what coverage options are available.

Homeowners should also budget for removal and disposal fees for the old roofing materials. Many states and cities have regulations on how and where this waste can be disposed of, which can drive up the overall cost of the project.

It is a good idea for homeowners to have a clear understanding of the full costs involved in a roof replacement before starting the project. The best way to do this is to consult with several contractors to receive estimates for the job. Then, the homeowner can choose a contractor that is willing to work within their budget and meets their quality requirements.

Materials

A roof replacement involves a substantial investment, and you want to choose the best material to protect your home. You want a durable material that is affordable and easy to maintain. You also need a roof that will add value to your home if you decide to sell it in the future.

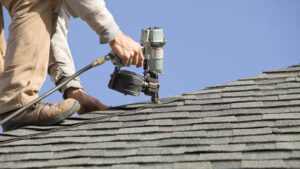
Many homeowners choose asphalt shingles, which offer a good balance of price and longevity. They are durable and can last up to 20 years. They are also inexpensive and easy to repair. If you’re looking for a more luxurious roofing option, you may want to consider wood shingles or shakes. These look more attractive and can raise your home’s value. However, they can be prone to plant and moss growth.

Tile and slate are mid-range materials. They’re heavier than shingle roofs, and you may need extra support to handle the weight. However, they can last up to 100 years or more. They’re also a great choice for hot climates, as they help your home retain cool air.

You can also choose metal roofs, which are relatively inexpensive and can last 30 to 50 years. They’re suitable for many climates, and they can even mimic the appearance of traditional asphalt shingles or cedar shakes.

If you’re not sure which material to choose, talk to a roofer. They can advise you on what works well for your area, and you can compare costs. They’ll also provide you with a manufacturer warranty that will protect you from problems like leaks for years to come.

A new roof can take a lot of time to install, so you’ll need to be patient during the process. You’ll have to deal with hammering, drilling, and other noises for several days or weeks while your roof is being replaced. You can prepare for this by moving your valuables to a safe location or by staying away from the house during the work period.

Installation

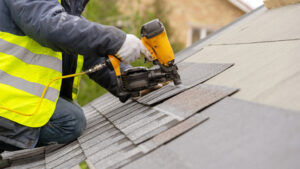
If your roof has been damaged to the point that a full replacement is needed, it will typically take one or two days to complete. After the new roof is installed, the contractor will clean up your property and inspect the work to ensure it meets quality standards. They will then clean up all of the old roofing materials and dispose of them appropriately.

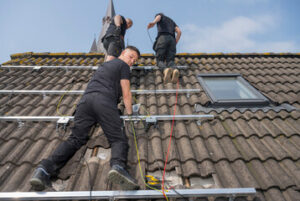
To prepare for a new roof, the crew will set up protection on your property to keep debris and other items out of the way while they are working. This includes tarps that cover cars and other items, as well as heavy duty plastic sheets that cover the decking of your home. Once everything is ready, they will begin to tear off your old roof and expose the underlying sheathing and rafters. If necessary, they will make repairs to these structural components.

Once the existing shingles are removed, they will install a water-repelling underlayment to protect the wooden structure of your roof. This material will stop moisture from getting between shingles and can prevent the wood from rotting and becoming weak over time. The crew will then lay down rows of asphalt roofing paper to form an inner barrier against rainwater. The roofer will also put down a metal drip edge to prevent moisture from pooling at the base of the shingles.

Depending on your geographic location, the roofer may also install ice dam protection to prevent melting snow from backing up under the shingles and penetrating through the sheathing. Finally, the installer will add or replace any flashing at areas of the roof that are prone to leaks, such as around chimneys, skylights, pipes, vents, and roof valleys.

Once the installation is complete, the contractor will remove all of the tarps and debris from your property and go over your lawn to pick up nails and other debris that fell during the project. If you are interested in having a roof installed, it is important to choose a qualified contractor that has the proper insurance coverage and workers’ compensation for the safety of their employees. You should also request a copy of the contract before making any payments and ask about their quality control process.

Warranty

When getting a roof replacement, it’s important to understand the different types of warranties that are available. There are different manufacturers’ warranties and contractor workmanship warranties, as well as extended and upgrade warranties that can be purchased.

Manufacturer warranties typically guarantee the materials that were used in your roof replacement, and they will usually cover any issues related to those materials for a set amount of time after the roofing project is complete. Contractor workmanship warranties, on the other hand, cover the labor that was performed by the contractor during the installation process. These warranties also typically have specific stipulations and conditions that may cause them to be voided if not followed correctly.

Some of the most common issues with roof repairs and replacements are due to faulty or improper installation. That’s why it’s so important to choose a professional roofing contractor for your roof replacement. They should have a good track record and a solid reputation in the industry. They should also be licensed and insured to work in your community.

You should also ask your prospective roofing contractor about the type of warranty they offer and what it covers. They should be able to provide you with all of the information you need to make an informed decision about which warranty is right for you.

It’s also important to note that most of these warranties are only valid if you register them with the manufacturer. It’s a good idea to do this as soon as possible, as it will ensure that you get the coverage you deserve if something goes wrong with your roof.

In addition, you should try to keep the same contractor throughout the duration of your warranty in order to protect it. Many manufacturers have strict policies that will void the warranty if another contractor is hired for repairs or maintenance, so it’s best to stick with your original roofing contractor. This way, they will be familiar with your roof and its needs and will be able to address any concerns faster. It will also help you to avoid any unnecessary or unneeded expenses in the future.

Roofing

How to Succeed in a Roofing Company

Running Roofing Company involves more than just fixing roofs. You also need to wear a lot of different hats. This includes sales, marketing, and finance. You may also need to get a business license, depending on the laws in your area.

Roofing

Legitimate roofing companies will always give homeowners a written estimate. If they do not, then you should avoid them.

Roofing companies often struggle to maximize their profit margins. There are many factors that can affect a roofing company’s profit, from weather occurrences to excess materials. However, there are also several ways to increase profits, including streamlining operations and cutting down on unnecessary costs.

Generally, roofing companies make between 20% and 40% gross profit. This number may be higher for service-focused companies and lower for new construction or large commercial companies. It is important to note that these figures do not take into account indirect costs such as sales commission or overhead.

One of the biggest factors in determining the profit margin for your roofing business is the amount you pay your employees. The more professional your employees are, the more money you can charge for your services. This is why it is important to hire employees who are qualified and have experience in the industry.

Another way to increase your profit margin is by reducing the amount of materials you use on each job. You can do this by taking advantage of discounts offered by suppliers or by bargaining with vendors. Additionally, you can also consider offering credit to customers with good payment histories. This can be a great way to boost your profit margins and encourage repeat business.

A roofing contractor can also increase its profits by focusing on niche markets. This may include homeowners in non-storm chaser areas, restaurants or universities. By focusing on a specific group of consumers, a roofing contractor can make more money while also improving its reputation.

When estimating jobs, it is important to use an accurate system for marking up materials and labor. The markup must be a percentage of the final selling price, not the job cost. Too many contractors miscalculate this and end up with a low profit margin. For example, if the job cost is $1,000, most roofing contractors will assume they are making a 10 percent profit, and bid $1,100 for the project.

To improve profit margins, roofing businesses should consider using Leap, a cloud-based software that helps streamline estimates and customer service. It can also help streamline inventory and project management. In addition, it can provide a more professional sales experience for customers.

Roofing materials

Roofing materials are important for a home’s overall look and function, and should be chosen carefully to ensure the best protection possible. Many factors come into play, including cost and durability. Choosing the right material will help homeowners increase the value of their homes and save money over time. The roofing material should also meet the local fire codes and be compatible with the framing of the house.

The most popular roofing material is asphalt shingles. These are available in a wide range of colors and styles, and they can add a dramatic accent to any home. In addition to being affordable, shingle roofs are durable and easy to maintain. Some homeowners choose to replace their shingle roofs every five to 10 years.

Other types of roofing materials include metal and slate tiles. Slate is one of the most expensive roofing materials, but it can last up to 150 years and is fire-resistant. Metal is another durable option, with lifespans of up to 35 years. It is often used on flat or low-slope roofs and can be molded or pressed to mimic other roofing materials.

A roofing company can help you determine the best materials for your home’s roof. They can advise you on the pros and cons of different roofing options, and recommend the best solution based on your home’s unique characteristics. They can also inspect the roof for soft spots, damage, and other issues that may need to be addressed.

Whether you are looking for commercial or residential roofing, a professional roofing contractor can help you get the job done right. These professionals can handle all aspects of a roofing project, from the installation of insulation to the waterproofing membrane. In addition, they can help you avoid any unexpected problems that might arise during the course of the job.

Roofing contractors use a variety of roofing materials, including metal, asphalt, and natural slate. These materials are durable and can withstand heavy winds, rains, and snow. They are also fire-resistant and are available in a variety of styles to match your home’s aesthetic. They can also be installed in combination with solar panels and heating cables to conserve energy.

Insurance

Roofing is a tough business, and accidents can and do happen. A quality insurance package can help a roofing company recover from these losses. Some of the most important coverages include workers’ compensation, general liability, and commercial auto. In addition, a builders risk policy can protect buildings and materials while they are being constructed or renovated.

Workers’ Compensation insurance provides financial assistance if an employee is injured on the job. This can cover past medical expenses, future treatment costs, and lost wages. Having this type of insurance will ensure that your employees are covered and can continue to provide you with quality service. It is also a legal requirement in most states. Depending on the state, you may be able to save money by offering this coverage to your employees.

General Liability insurance is another key policy for roofing contractors. This insurance protects the roofing company against claims of property damage or bodily injury to third parties. It can be purchased separately or as part of a business owner’s policy (BOP). Errors and omissions insurance, or professional liability, is another common policy that protects roofing companies against lawsuits. This coverage is useful if a roofer makes a mistake or gives bad advice that causes the client to lose money.

In addition to these coverages, roofing companies should consider adding commercial auto insurance and an equipment floater. Commercial auto insurance covers vehicles that are used for business purposes. This includes any vehicle that is used to transport shingles or tools to the job site. A commercial auto policy can include a number of options for limits, deductibles, and ineligibility. This type of coverage is a must for any business that has vehicles. A business can save on its premium by implementing and documenting a safety program, and by paying the policy upfront instead of monthly. It is also possible to qualify for a discount if the business joins an industry or trade association. Lastly, a business can purchase an equipment floater policy to protect the company’s high-value equipment in transit. This type of insurance is especially helpful for construction businesses that ship large machinery or trusses on a regular basis.

Employees

If you want your roofing company to succeed, you have to provide good working conditions for your employees. This will increase their job satisfaction and keep them from seeking employment elsewhere. This includes ensuring that they have all the equipment needed to perform their work safely and efficiently. For example, they should wear hard hats, boots and safety harnesses. They should also use appropriate ladders and have access to a sturdy platform or scaffold. Moreover, they must be trained in basic safety operations both online and in-person.

The roofing industry has a shortage of skilled labor, which can cause problems for small businesses. It’s important to find creative ways to recruit and retain qualified workers, such as partnering with non-competing companies or offering apprenticeships. Recruiting at local high schools and vocational training programs is another way to attract new employees. Many of these students are eager to learn a trade, and you can help them avoid the burden of student debt.

Despite the shortage of skilled workers, it’s not impossible to start a roofing business. You can do several things to improve the odds of success, including registering your business as a corporation, partnership or limited liability company (LLC). LLCs are popular with roofing contractors because they protect the personal assets of owners in the event of lawsuits. However, you should consult a lawyer before deciding which entity to register.

Another key factor in the success of a roofing company is establishing a solid brand. In addition to advertising and marketing, a strong brand can help you stand out from competitors and attract customers. It can also reduce the risk of liability by ensuring that your insurance policy covers your business expenses. In addition, a strong brand can attract talented employees and build customer loyalty. Moreover, it can help you save money on payroll taxes.

Roofing

How to Properly Perform Roof Installation

5R Roofing is a major home improvement staple. Leave this task to the pros to install your new roof properly.

Before starting, ensure a clear path for the roofing contractors to get around your house. Remove outdoor toys and furniture to prevent damage from falling shingles and nails.

The first step of any roof installation is tearing off the old roof. While it may seem tempting to place a new roof on top of an existing one (and even some contractors out there claim they can do this), this is nearly impossible and can cause premature roofing failure. Removing the old roof also provides a smooth surface for the new shingles and allows any hidden damage to be corrected before it worsens.

Once the roofing contractor has completed this step, they will install the underlayment, ice and water shield, and ridge cap. They will begin at the eaves and metal drip edge, working their way up to the roof’s peak.

Depending on the size of your roof, they may use either a roof jack or an extension ladder to gain access. They will then set up a series of tarps throughout the top to catch nails and debris, making cleanup easier at the end of the job. It is also good to rent a dumpster for the old shingles and materials to keep the mess off your property.

While the shingle removal is in progress, the roofers will remove the flashing if they still need to. They will hammer the old nails out of the roof decking so they do not stick up and can be easily reinstalled with the new roofing materials.

Finally, mark any plants or flower beds around your home that you don’t want to be disturbed and fence them off before the roofing job begins. Even conscientious roofers will kick up a fair amount of dirt and debris when working, so it’s best to take precautions to protect your yard and possessions.

The underlayment is the first layer of protection for a roof’s interior and deck. It protects against water and wind damage and is needed before roof-covering materials are installed. Underlayment is comprised of various materials, including asphalt-saturated felt (traditional roofing “felt”) and synthetic polymers such as polypropylene or polyethylene. The type of underlayment used will depend on the roofing material and climate, the roof slope, and construction codes and requirements.

Underlayment is often fastened with staples or nails, but in high-wind areas and synthetic underlayments, it’s usually attached with plastic caps. That minimizes the holes caused by nailing and is less likely to blow off or be pulled up with a strong wind. A separate ice barrier underlayment is needed in locations where snow and ice tend to build up along the eaves (causing meltwater to fall under shingles and creating ice dams).

An important consideration is the underlayment’s permeability rating. Underlayments with a rating of 1 or less are considered moisture barriers. They can prevent the passage of water vapor, while underlayments with a higher permeability are more like house wrap and will retard moisture but not prevent it.

Some underlayments are designed to work with specific roof-covering materials and may require certain tools and follow special installation procedures. Using the wrong underlayment can void a manufacturer’s warranty, so it’s important to ensure that the contractor you hire operates correctly. Most manufacturers specify that only their shingles should be used with their underlayment, so you should find out before hiring what type of underlayment is required for the kind of shingles you have installed.

Many aspects of construction go unnoticed, but the flashing surrounding structures like chimneys, vents, skylights, and roofs are essential for preventing leaks and other problems. Essentially, flashing is a sheet of thin metal that closes the joints between two surfaces to keep water from seeping into walls or roofing materials.

There are different types of flashing, each serving a specific purpose. For example, step flashing seals the area where a roof meets a vertical surface, such as a dormer or a skylight. The flashing is layered from the bottom up, with each piece overlapping the one above it to form steps that rainwater can flow down. That prevents leaks and protects the structure beneath.

Valley flashing is also needed to prevent leaks where a roof slopes down. This type of flashing is made of a metal such as aluminum or galvanized steel and consists of base flashing and counter flashing, overlapping to create an impenetrable barrier. Unlike step flashing, which is mostly concealed by shingles, valley flashing is exposed.

Other types of flashing are needed to protect the areas around structures that protrude from the roof, such as a chimney or pipes for water or vents. These pieces are often installed as part of the roofing, happening as the rows of shingles progress upward on the roof deck.

Ridge flashing is another flashing that can be used to prevent leaks in the ridges of a roof. That is a very long strip of metal that runs up the center of the top, and it’s typically covered with a layer of shingle material to protect against corrosion.

A roofing job is only complete with shingles. You’ll need several bundles of shingles to cover the roof, depending on its size and pitch (slope). Use our shingle calculator to find out how many shingles you need. It considers the roof area, the number of shingle courses, and an overage allowance. It also explains what the numbers mean to buy the right amount of shingles.

Start by applying a starter course of shingles, or “strip,” with the self-sealing strip facing up along the eave. Then, nail the first full course of shingles into place, starting at the left rake edge and working up toward the ridge. Use the vertical chalk line to keep shingle rows straight and, in high-wind areas, six nails per shingle, as the manufacturer recommends.

If your roof has open valleys instead of closed ones, you should install a pre-formed width of corrosion-resistant metal flashing during the shingle installation process. That will help ensure that water sheds from the roof properly and minimize leaks in the future.

As recommended by the shingle manufacturer, any roof planes that butt against the eaves are covered by step flashing, usually steel metal at least 125 mm high and five in. wide. Leaks often occur at these junction points, so it’s important to take the time to install the proper flashing. You’ll also need flashing around chimneys and vents and any other special features on the roof. Remember the drip edge, which should be attached to the fascia board with 1-1/4-inch roofing nails. That will help keep water off the wood siding and prevent mold and rot problems.

A roof needs a ridge cap to finish the look of it and protect your home. A ridge cap is a small shingle covering the peak where two sloping sides of a roof meet. Residential houses in traditional styles usually feature gable roofs with two equal sides that meet at the top of the structure.

Ridge caps in different colors and finishes match a specific roof’s aesthetics. They’re also available as vented or non-vented, which helps with ventilation. The former allows air to flow through the top, while the latter blocks airflow and requires regular sealing to prevent leaks.

When selecting a ridge cap, it is important to find one that matches the color of your existing shingles. It would be best to opt for a vented ridge cap to improve ventilation and protect your home from pests and rodents. These pests can enter your attic through vents, cuts, holes, and gaps on the roof ridge and cause extensive damage to your property.

For the best results, following the roofer’s instructions when installing your ridge cap is important. That is particularly important when overlapping the ridge cap with the shingles on the rest of your roof. In addition, it is important to use longer roofing nails for the ridge cap because of its added thickness and layers.

Depending on the extent of the damage to your roof, you may need to choose between a repair and a replacement. A professional roofer can help you decide which option is best for your home. They will also be able to let you know whether your roof ridge cap is damaged and needs replacement.

Windows Designs
Uncategorized

Aesthetic Roofing Windows Designs

Windows play a critical role in the appearance of your home. The right window design adds curb appeal and can increase your home’s resale value.

Roof windows bring natural light into rooms with a ceiling and can deliver up to twice as much light as vertical windows. They also create a ventilation channel that transports indoor odors outside.

Arched Windows

Arched windows are a stunning architectural feature in any home or building. However, finding the right window treatments that will highlight these gorgeous architectural designs can be challenging. There are many different ways to dress up your arched windows, from the traditional to the contemporary. Here are some of the best options to consider:

Drapery is one of the most popular options for covering arched windows. It allows you to show off the beauty of the arch while still providing privacy and light control. There are several different drapery styles you can choose from, including sheer fabrics, non-operational swags of fabric, and flowing draperies that sweep the arched frame like a sunburst. These types of window treatments are great for creating a dramatic effect in any space and complement the arched shape with their own unique style.

Another great option for covering arched windows is to use a decorative window scarf. This is a simple and affordable way to add a beautiful touch of elegance to your arched windows. You can hang these window scarves from attractive hooks or drapery ornaments that you install on the wall above your windows.

You can also use a window valance for your arched windows. This is a great option for blending in your windows with the rest of your room. You can choose from a variety of valances to match your room’s decor. You can also find valances that are made of woven wood or a material that is similar to your window frames.

Another way to add some flair to your arched windows is to use a curved window covering. These can be either blinds or curtains. You can hang them from attractive curtain rods that you install on the wall above your arched windows. This will help to create a beautiful contrast with the straight lines of your home’s architecture.

If you want to save money on your energy bills, you can try a vinyl clad arched window. This type of window is inexpensive and provides good insulation. It is also easy to clean and doesn’t require much maintenance. You can also choose to clad your arched window with wood or fiberglass for a more luxurious look. You can also choose to customize your arched windows with custom grids that simulate divided lites. This will make it easier to clean the glass while still allowing natural light into your home.

Sliding Windows

If you want a window that lets in plenty of natural light and offers expansive views of your surroundings, sliding windows might be the perfect choice for you. They’re available in a wide range of sizes, so you can select the right size to fit your home and meet your unique needs. These windows have fewer bars that break up the view and are easier to operate than other traditional window styles. They also offer fresh air capabilities, allowing you to open them and enjoy the outdoors’ fresh air.

Sliding windows are typically made from vinyl, PVC, aluminum or wood, depending on your preferences and budget. They come in a variety of colors and finishes to complement your home’s design and exterior style.

These windows are easy to use and require minimal maintenance, allowing you to save time and money on cleaning and repair costs. However, they’re not as energy-efficient as double-hung windows because they don’t seal as tightly.

Aesthetically, sliding windows work well with colonial, ranch and mid-century homes but can also be incorporated into modern and art deco designs. They’re sleek and elegant, and they can add a contemporary touch to any room.

Another advantage of sliding windows is that they can be opened fully from either side, which allows for a high level of ventilation and can help to reduce your energy bills. This type of window is particularly suited to climates that experience hot summers because it can provide natural cooling and eliminate musty odors.

Sliding windows come in two styles: single-hung and double-hung. They are characterized by how many sashes (or panes) that they allow to slide open along the window sill and jambs. Single-hung windows have one sash that can slide open, while double-hung windows have two sashes that can both open and close.

Sliding windows are known for their durability and longevity, but the lifespan of a window is largely dependent on the framing material that is used. Aluminum and fiberglass frames generally have the longest lifespans while wood and vinyl frames tend to last the shortest amount of time.

Bay Windows

Bay windows are beautiful and elegant additions to your home. They provide a sense of added space and allow natural light to fill the room, which gives it an inviting atmosphere. They also add a touch of class and enhance your curb appeal. These windows are popular among homeowners because they can improve your home’s design and raise its value.

A bay window consists of three windows that protrude from the house, giving it a more expansive look than traditional flat windows. They’re often found in living rooms, dining rooms, and bedrooms, and are a great way to bring more natural light into the space. A bow window, on the other hand, consists of four to six windows that are joined together and create a gentle curve.

Bay and bow windows can also enhance your home’s ventilation. Since they have side panels that can open and close, you can easily let in fresh air. This makes them a good choice for people who want to save money on energy bills. They’re also a nice alternative to standard window blinds, which can be difficult to open and close.

If you’re considering adding a bay or bow window to your home, be sure to work with a professional window installation company. They’ll be able to help you decide the best options for your needs and install them correctly. In addition, they’ll be able to ensure that your new windows are properly sealed to keep out the elements and moisture.

Modern bay and bow windows can transform any room into a cozy reading nook or relaxing lounge. You can add a daybed, built-in shelves, or storage units to make the most of this versatile window style. With the right décor, you can turn your bay windows into a focal point of your home and increase its value.

If you’re looking for a more traditional bay window, consider choosing one that includes a large picture window with thinner casement or double hung windows for the side panels. This combination provides a classic aesthetic and offers an expansive view of your backyard. You can also choose a box bay window, which is smaller but still provides ample seating and reading space.

Picture Windows

The beauty of a picture window is that it frames nature outside your home. They are most often seen in living rooms, family rooms, great rooms and bathrooms, but they can be added to any room in the house that needs more natural light or a view of a backyard pool or lush garden. When used in large numbers, they can create a whole wall of glass that is incredibly beautiful and also helps to increase the amount of sunlight that enters a space. You can also use a combination of rectangular and square picture windows along with shaped windows for a unique look that is sure to impress.

The biggest drawback to a picture window is that it does not open like other types of windows, so it cannot provide ventilation or air flow. Because of this, homeowners often pair them with windows that do open, such as a double-hung or sliding window. This allows for a bit more ventilation while still providing the beauty and light that a picture window brings to a space.

Because they do not have moving parts, these windows are extremely easy to clean and maintain. There are no hard-to-reach nooks or corners to sanitize, and they generally cost less than other windows that require mechanical parts to operate.

They do, however, let in a lot of natural light that can cause heat gain during the winter, so they must be properly insulated to avoid higher energy bills. When choosing a picture window, make sure it has an insulated frame and the proper U-factor and Solar Heat Gain Coefficient (SHGC) values to protect your home from unwanted temperature fluctuations.

You can further enhance the aesthetic of a picture window by adding upgrades like grilles and shutters. You can even add a casement or awning window on either side to allow for ventilation and additional light without sacrificing the overall design of your new picture window. If you would like to add even more functionality, consider pairing your picture window with a bay window configuration. This allows for ventilation while creating a larger, more interesting design that makes your house look bigger and more spacious.