5R Roofing is a major home improvement staple. Leave this task to the pros to install your new roof properly.
Before starting, ensure a clear path for the roofing contractors to get around your house. Remove outdoor toys and furniture to prevent damage from falling shingles and nails.
The first step of any roof installation is tearing off the old roof. While it may seem tempting to place a new roof on top of an existing one (and even some contractors out there claim they can do this), this is nearly impossible and can cause premature roofing failure. Removing the old roof also provides a smooth surface for the new shingles and allows any hidden damage to be corrected before it worsens.
Once the roofing contractor has completed this step, they will install the underlayment, ice and water shield, and ridge cap. They will begin at the eaves and metal drip edge, working their way up to the roof’s peak.
Depending on the size of your roof, they may use either a roof jack or an extension ladder to gain access. They will then set up a series of tarps throughout the top to catch nails and debris, making cleanup easier at the end of the job. It is also good to rent a dumpster for the old shingles and materials to keep the mess off your property.
While the shingle removal is in progress, the roofers will remove the flashing if they still need to. They will hammer the old nails out of the roof decking so they do not stick up and can be easily reinstalled with the new roofing materials.
Finally, mark any plants or flower beds around your home that you don’t want to be disturbed and fence them off before the roofing job begins. Even conscientious roofers will kick up a fair amount of dirt and debris when working, so it’s best to take precautions to protect your yard and possessions.
The underlayment is the first layer of protection for a roof’s interior and deck. It protects against water and wind damage and is needed before roof-covering materials are installed. Underlayment is comprised of various materials, including asphalt-saturated felt (traditional roofing “felt”) and synthetic polymers such as polypropylene or polyethylene. The type of underlayment used will depend on the roofing material and climate, the roof slope, and construction codes and requirements.
Underlayment is often fastened with staples or nails, but in high-wind areas and synthetic underlayments, it’s usually attached with plastic caps. That minimizes the holes caused by nailing and is less likely to blow off or be pulled up with a strong wind. A separate ice barrier underlayment is needed in locations where snow and ice tend to build up along the eaves (causing meltwater to fall under shingles and creating ice dams).
An important consideration is the underlayment’s permeability rating. Underlayments with a rating of 1 or less are considered moisture barriers. They can prevent the passage of water vapor, while underlayments with a higher permeability are more like house wrap and will retard moisture but not prevent it.
Some underlayments are designed to work with specific roof-covering materials and may require certain tools and follow special installation procedures. Using the wrong underlayment can void a manufacturer’s warranty, so it’s important to ensure that the contractor you hire operates correctly. Most manufacturers specify that only their shingles should be used with their underlayment, so you should find out before hiring what type of underlayment is required for the kind of shingles you have installed.
Many aspects of construction go unnoticed, but the flashing surrounding structures like chimneys, vents, skylights, and roofs are essential for preventing leaks and other problems. Essentially, flashing is a sheet of thin metal that closes the joints between two surfaces to keep water from seeping into walls or roofing materials.
There are different types of flashing, each serving a specific purpose. For example, step flashing seals the area where a roof meets a vertical surface, such as a dormer or a skylight. The flashing is layered from the bottom up, with each piece overlapping the one above it to form steps that rainwater can flow down. That prevents leaks and protects the structure beneath.
Valley flashing is also needed to prevent leaks where a roof slopes down. This type of flashing is made of a metal such as aluminum or galvanized steel and consists of base flashing and counter flashing, overlapping to create an impenetrable barrier. Unlike step flashing, which is mostly concealed by shingles, valley flashing is exposed.
Other types of flashing are needed to protect the areas around structures that protrude from the roof, such as a chimney or pipes for water or vents. These pieces are often installed as part of the roofing, happening as the rows of shingles progress upward on the roof deck.
Ridge flashing is another flashing that can be used to prevent leaks in the ridges of a roof. That is a very long strip of metal that runs up the center of the top, and it’s typically covered with a layer of shingle material to protect against corrosion.
A roofing job is only complete with shingles. You’ll need several bundles of shingles to cover the roof, depending on its size and pitch (slope). Use our shingle calculator to find out how many shingles you need. It considers the roof area, the number of shingle courses, and an overage allowance. It also explains what the numbers mean to buy the right amount of shingles.
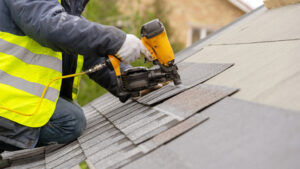
Start by applying a starter course of shingles, or “strip,” with the self-sealing strip facing up along the eave. Then, nail the first full course of shingles into place, starting at the left rake edge and working up toward the ridge. Use the vertical chalk line to keep shingle rows straight and, in high-wind areas, six nails per shingle, as the manufacturer recommends.
If your roof has open valleys instead of closed ones, you should install a pre-formed width of corrosion-resistant metal flashing during the shingle installation process. That will help ensure that water sheds from the roof properly and minimize leaks in the future.
As recommended by the shingle manufacturer, any roof planes that butt against the eaves are covered by step flashing, usually steel metal at least 125 mm high and five in. wide. Leaks often occur at these junction points, so it’s important to take the time to install the proper flashing. You’ll also need flashing around chimneys and vents and any other special features on the roof. Remember the drip edge, which should be attached to the fascia board with 1-1/4-inch roofing nails. That will help keep water off the wood siding and prevent mold and rot problems.
A roof needs a ridge cap to finish the look of it and protect your home. A ridge cap is a small shingle covering the peak where two sloping sides of a roof meet. Residential houses in traditional styles usually feature gable roofs with two equal sides that meet at the top of the structure.
Ridge caps in different colors and finishes match a specific roof’s aesthetics. They’re also available as vented or non-vented, which helps with ventilation. The former allows air to flow through the top, while the latter blocks airflow and requires regular sealing to prevent leaks.
When selecting a ridge cap, it is important to find one that matches the color of your existing shingles. It would be best to opt for a vented ridge cap to improve ventilation and protect your home from pests and rodents. These pests can enter your attic through vents, cuts, holes, and gaps on the roof ridge and cause extensive damage to your property.
For the best results, following the roofer’s instructions when installing your ridge cap is important. That is particularly important when overlapping the ridge cap with the shingles on the rest of your roof. In addition, it is important to use longer roofing nails for the ridge cap because of its added thickness and layers.
Depending on the extent of the damage to your roof, you may need to choose between a repair and a replacement. A professional roofer can help you decide which option is best for your home. They will also be able to let you know whether your roof ridge cap is damaged and needs replacement.